RP2040 programozásának kezdeti beálltása linux alá.
| SoC | GPIO | Extra Features | Dimensions | |
|---|---|---|---|---|
| Raspberry Pi Pico | Dual-core Arm Cortex M0+ processor, flexible clock running up to 133 MHz, 264KB of SRAM, and 2MB of on-board Flash memory | 26 × multi-function GPIO pins 2 × SPI, 2 × I2C, 2 × UART, 3 × 12-bit ADC, 16 × controllable. 8 × Programmable I/O (PIO) state machines for custom peripheral support | Accurate clock and timer on-chip. Castellated module allows soldering direct to carrier boards. | 21 x 51mm |
| Adafruit Feather RP2040 | Dual-core Arm Cortex M0+ processor, flexible clock running up to 133 MHz, 264KB of SRAM, and 4MB of on-board Flash memory | 21 GPIO Pins, 4 x 12 bit ADC, 2 x I2C, 2 x SPI, 2 x UART, 16 x PWM, STEMMA QT | 200mA lipoly charger, RGB Neopixel, Reset Button, USB C | 50.8 x 22.8mm |
| Adafruit ItsyBitsy RP2040 | Dual-core Arm Cortex M0+ processor, flexible clock running up to 133 MHz, 264KB of SRAM, and 4MB of on-board Flash memory | 23 GPIO Pins, 4 x 12 bit ADC, 2 x I2C, 2 x SPI, 2 x UART, 16 x PWM, STEMMA QT | RGB Neopixel, Reset Button, Micro USB | 36 x 18mm |
| Pimoroni TinyRP2040 | Dual-core Arm Cortex M0+ processor, flexible clock running up to 133 MHz, 264KB of SRAM, and 8MB of on-board Flash memory | 12 GPIO Pins, 4 x 12 bit ADC | RGB LED, User Switch | 22.5 x 18mm |
| SparkFun Thingy Plus | Dual-core Arm Cortex M0+ processor, flexible clock running up to 133 MHz, 264KB of SRAM, and 16MB of on-board Flash memory | 30 GPIO Pins, 4 x 12 bit ADC, 2 x UART, 2 x I2C, 2 x SPI, QWIIC Connector | 500mA lipoly charger, RGB LED, Rest Button | 58.4 x 22.8mm |
Pi pico programozása windows alatt Arduino IDE-vel (sikerült a blink :) ). Innét a segítség tomshardware - köszi ! A windows-os program telepítése link.
Arduino IDE letöltés,
beállítása
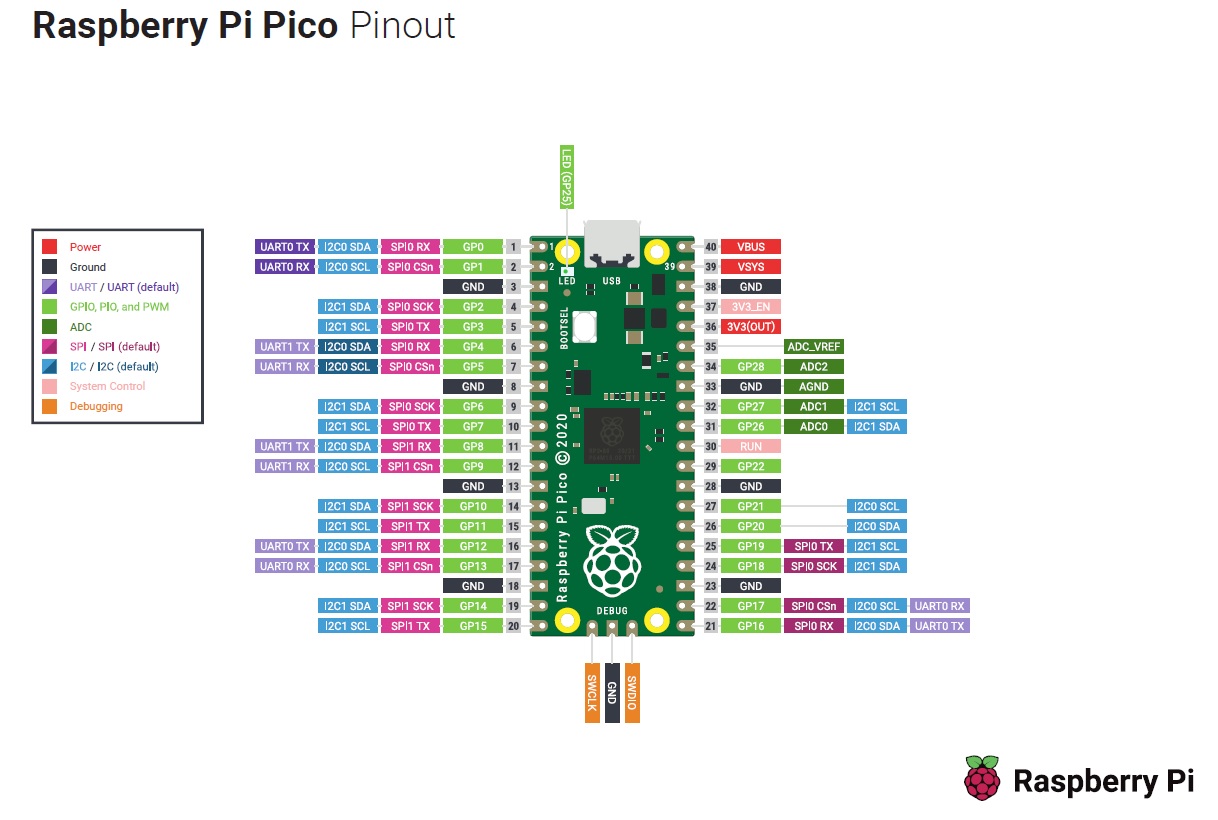
https://github.com/earlephilhower/arduino-pico/releases/download/global/package_rp2040_index.jsonPi pico programozásának beállítása (kezdeti lépések) linux (ubuntu 20 LTS) alá. Pico lábkiosztása.
- alapok: (getting start Raspberry pi pico)
sudo apt updateapt full-upgradewget -O pico_setup.sh https://rptl.io/pico-setup-script
chmod +x pico_setup.sh./pico_setup.shsudo reboot - ethernet board telepítés LAN8720 Wavwshare összekötése picoval
- git clone
- ha nem menne a git clone parancs (git clone Ez az e-mail-cím a szpemrobotok elleni védelem alatt áll. Megtekintéséhez engedélyeznie kell a JavaScript használatát.:sandeepmistry/pico-rmii-ethernet.git), akkor "git clone https://github.com/sandeepmistry/pico-rmii-ethernet.git" működhet.
git clone https://github.com/sandeepmistry/pico-rmii-ethernet.gitcd pico-rmii-ethernetgit submodule update --initexport PICO_SDK_PATH = /home/pi/pico/pico-sdkmkdir buildcd buildcmake ..make -> (az elkészlt uf2 fájl helye: /~/rmii_ethernet/build/examples/httpd/pico_rmii_ethernet_httpd.uf2)
BOOTSEL+ NYOMÓGOMB bekötése, használata.
Erre azért van szükség, hogy ne kelljen az USB portot folyamatosan a raspberry pi pico-n ki-be dugdosni, huzogatni.
- BEKÖTÉSE:
- egy NYOMÓGOMB a GND és a RUN összekötéséhez NYOMÓGOMB (PIN 38, GND - PIN 30, RUN )
- HASZNÁLAT:
- megnyomni a NYOMÓGOMB-ot majd a picon a BOOTSELgombot, aztán felengedni a NYOMÓGOMB-ot majd a BOOTSEL gombot
- ezután megjeleni a pico meghajtó ahova bemásolhatjuk az elkészített. UF2 fájl-t
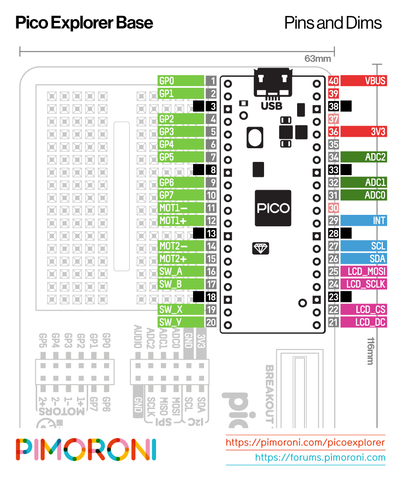
Pico lábkiosztása (+ pimoroni explorer)


LAN 8720 összekötése a raspberry pi picohoz
| Pico | RP20401 | LAN8720 Breakout |
| Pin 9 | GP6 | RX0 |
| Pin 10 | GP7 | RX1 (RX0 + 1 ) |
| Pin 11 | GP8 | CRS (RX0 + 2) |
| Pin 14 | GP10 | TX0 |
| Pin 15 | GP11 | TX1 (TX0 + 1) |
| Pin 16 | GP12 | TX-EN (TX0 + 2) |
| Pin 19 | GP14 | MDIO |
| Pin 20 | GP15 | MDC |
| Pin 26 | GP20 | nINT / RETCLK |
| 3V3 (OUT) | — | VCC |
| Pin 38 | GND | GND |
RTS = Ready to Send
| RMII Module | Raspberry Pi Pico | Library Default |
|---|---|---|
| TX1 | TX0 + 1 | 11 |
| TX-EN | TX0 + 2 | 12 |
| TX0 | any GPIO | 10 |
| RX0 | any GPIO | 6 |
| RX1 | RX0 + 1 | 7 |
| nINT / RETCLK | 20 or 22 | 20 |
| CRS | RX0 + 2 | 8 |
| MDIO | any GPIO | 14 |
| MDC | MDIO + 1 | 15 |
| VCC | 3V3 | |
| GND | GND |
| Ethernet modul megnevezése | Ethernet megnevezések | RP Pico megnevezés | RP Pico GPIO | RP Pico PIN | RP GPIO | RP PIN | Arduino UNO | Arduino MEGA | Arduino Nano |
| HR911105A | Wiznet W5100 | W5100 | W5100 | W5100 | W5100 | W5100 | W5100 | W5100 | ENC28J60 |
| V+5, VCC | power | 3.3 V | 3.3 V OUT | 2 | 5V (van 5V-os kimenet) | 5V | 5V | ||
| GND, G | Ground | Ground | GND | 38 | 6 | GND | GND | GND | |
| MO, MOSI, SI, DIN, TX | Data input | GP3 (SP10 TX) SP1x_TX | GP10 | 14 | GPIO10 | D11 | D51 | D11 | |
| SCK, CLK, SCLK, CK | Clock | GP2 (SP10 SCK) SP1x_SCK | GP15 | 20 | GPIO23 | D13 | D53 | D13 | |
| MI, MISO, SO, DON, RX | Data outpu | GP4 (SP10 RX) SP1x_RX | GP6 | 9 | GPIO09 | D12 | D52 | D12 | |
| CS, SS, NSS, CRS | Chip select | CRS (RX0 + 2) | GP8 | 11 | GPIO24 | D10 | D10, D53 | D10 | |
| INT | nINT / RETCLK, REFCLK0 | GP20 | 26 | GPIO25 | |||||
| RST | Reset | D09 | D09 | RESET |
| LAN 8720 | W5500, WIZ850io, W5100 (tesztelem még) | ||||||||
| oldal | How to add Ethernet to Raspberry Pi Pico - Raspberry Pi | oldal | How to add W5500 Ethernet to Raspberry Pi Pico (Python) - 1 - Hackster.io | ||||||
| Pico | RP20401 | LAN8720 | Pico megnevezés | pimoroni explorer | Pico GP | Pico PIN | W5500 | WIZ850io | W5100 |
| Pin 9 | GP6 | RX0 | SP11_RX | SP10_RX, GP4, PIN6 | GP12 | PIN16 | MISO | MISO | MISO, MO |
| Pin 10 | GP7 | RX1 (RX0 + 1 ) | |||||||
| Pin 11 | GP8 | CRS (RX0 + 2) | SP11_CSn | SP10_CSn, GP5, PIN7 | GP13 | PIN17 | SCNn | SCNn | SCNn, NSS |
| Pin 14 | GP10 | TX0 | SP11_TX | SP10_TX, GP7, PIN10 | GP11 | PIN15 | MOSI | MOSI | MOSI, MI |
| Pin 15 | GP11 | TX1 (TX0 + 1) | |||||||
| Pin 16 | GP12 | TX-EN (TX0 + 2) | |||||||
| Pin 19 | GP14 | MDIO | |||||||
| Pin 20 | GP15 | MDC | |||||||
| Pin 26 | GP20 | nINT / RETCLK | SP11_SCK | SP10_SCK, GP2, PIN4 | GP10 | PIN14 | SCLK | SCLK | SCLK, SCK, "SOK" |
| 3V3 (OUT) | — | VCC | 3.3V | 3.3V | 3.3V | 3.3V | 3.3V | ||
| Pin 38 | GND | GND | GND | GND | 3,8,13,18,23,28,33,38 | GND | GND | GND | |
https://rptl.io/pico-setup-script
#!/bin/bash |
# Exit on error |
set -e |
if grep -q Raspberry /proc/cpuinfo; then |
echo "Running on a Raspberry Pi" |
else |
echo "Not running on a Raspberry Pi. Use at your own risk!" |
fi |
# Number of cores when running make |
JNUM=4 |
# Where will the output go? |
OUTDIR="$(pwd)/pico" |
# Install dependencies |
GIT_DEPS="git" |
SDK_DEPS="cmake gcc-arm-none-eabi gcc g++" |
OPENOCD_DEPS="gdb-multiarch automake autoconf build-essential texinfo libtool libftdi-dev libusb-1.0-0-dev" |
# Wget to download the deb |
VSCODE_DEPS="wget" |
UART_DEPS="minicom" |
# Build full list of dependencies |
DEPS="$GIT_DEPS $SDK_DEPS" |
if [[ "$SKIP_OPENOCD" == 1 ]]; then |
echo "Skipping OpenOCD (debug support)" |
else |
DEPS="$DEPS $OPENOCD_DEPS" |
fi |
if [[ "$SKIP_VSCODE" == 1 ]]; then |
echo "Skipping VSCODE" |
else |
DEPS="$DEPS $VSCODE_DEPS" |
fi |
echo "Installing Dependencies" |
sudo apt update |
sudo apt install -y $DEPS |
echo "Creating $OUTDIR" |
# Create pico directory to put everything in |
mkdir -p $OUTDIR |
cd $OUTDIR |
# Clone sw repos |
GITHUB_PREFIX="https://github.com/raspberrypi/" |
GITHUB_SUFFIX=".git" |
SDK_BRANCH="master" |
for REPO in sdk examples extras playground |
do |
DEST="$OUTDIR/pico-$REPO" |
if [ -d $DEST ]; then |
echo "$DEST already exists so skipping" |
else |
REPO_URL="${GITHUB_PREFIX}pico-${REPO}${GITHUB_SUFFIX}" |
echo "Cloning $REPO_URL" |
git clone -b $SDK_BRANCH $REPO_URL |
# Any submodules |
cd $DEST |
git submodule update --init |
cd $OUTDIR |
# Define PICO_SDK_PATH in ~/.bashrc |
VARNAME="PICO_${REPO^^}_PATH" |
echo "Adding $VARNAME to ~/.bashrc" |
echo "export $VARNAME=$DEST" >> ~/.bashrc |
export ${VARNAME}=$DEST |
fi |
done |
cd $OUTDIR |
# Pick up new variables we just defined |
source ~/.bashrc |
# Build a couple of examples |
cd "$OUTDIR/pico-examples" |
mkdir build |
cd build |
cmake ../ -DCMAKE_BUILD_TYPE=Debug |
for e in blink hello_world |
do |
echo "Building $e" |
cd $e |
make -j$JNUM |
cd .. |
done |
cd $OUTDIR |
# Picoprobe and picotool |
for REPO in picoprobe picotool |
do |
DEST="$OUTDIR/$REPO" |
REPO_URL="${GITHUB_PREFIX}${REPO}${GITHUB_SUFFIX}" |
git clone $REPO_URL |
# Build both |
cd $DEST |
mkdir build |
cd build |
cmake ../ |
make -j$JNUM |
if [[ "$REPO" == "picotool" ]]; then |
echo "Installing picotool to /usr/local/bin/picotool" |
sudo cp picotool /usr/local/bin/ |
fi |
cd $OUTDIR |
done |
if [ -d openocd ]; then |
echo "openocd already exists so skipping" |
SKIP_OPENOCD=1 |
fi |
if [[ "$SKIP_OPENOCD" == 1 ]]; then |
echo "Won't build OpenOCD" |
else |
# Build OpenOCD |
echo "Building OpenOCD" |
cd $OUTDIR |
# Should we include picoprobe support (which is a Pico acting as a debugger for another Pico) |
INCLUDE_PICOPROBE=1 |
OPENOCD_BRANCH="rp2040" |
OPENOCD_CONFIGURE_ARGS="--enable-ftdi --enable-sysfsgpio --enable-bcm2835gpio" |
if [[ "$INCLUDE_PICOPROBE" == 1 ]]; then |
OPENOCD_BRANCH="picoprobe" |
OPENOCD_CONFIGURE_ARGS="$OPENOCD_CONFIGURE_ARGS --enable-picoprobe" |
fi |
git clone "${GITHUB_PREFIX}openocd${GITHUB_SUFFIX}" -b $OPENOCD_BRANCH --depth=1 |
cd openocd |
./bootstrap |
./configure $OPENOCD_CONFIGURE_ARGS |
make -j$JNUM |
sudo make install |
fi |
cd $OUTDIR |
# Liam needed to install these to get it working |
EXTRA_VSCODE_DEPS="libx11-xcb1 libxcb-dri3-0 libdrm2 libgbm1 libegl-mesa0" |
if [[ "$SKIP_VSCODE" == 1 ]]; then |
echo "Won't include VSCODE" |
else |
if [ -f vscode.deb ]; then |
echo "Skipping vscode as vscode.deb exists" |
else |
echo "Installing VSCODE" |
if uname -m | grep -q aarch64; then |
VSCODE_DEB="https://aka.ms/linux-arm64-deb" |
else |
VSCODE_DEB="https://aka.ms/linux-armhf-deb" |
fi |
wget -O vscode.deb $VSCODE_DEB |
sudo apt install -y ./vscode.deb |
sudo apt install -y $EXTRA_VSCODE_DEPS |
# Get extensions |
code --install-extension marus25.cortex-debug |
code --install-extension ms-vscode.cmake-tools |
code --install-extension ms-vscode.cpptools |
fi |
fi |
# Enable UART |
if [[ "$SKIP_UART" == 1 ]]; then |
echo "Skipping uart configuration" |
else |
sudo apt install -y $UART_DEPS |
echo "Disabling Linux serial console (UART) so we can use it for pico" |
sudo raspi-config nonint do_serial 2 |
echo "You must run sudo reboot to finish UART setup" |
fi |
